Sunday, October 15, 2017

Bottle blues 2

New morning, and I'm finishing the project heck or high water. Or, more likely, eye strain.

Finally got the fabrics somewhat attached. Cut them out, as stated before, and came across yet another thing that the instructions just seemed to make too hard. It says to cut a tiny hole to attach the snaps. Tried that. I could cut through the vinyl, but the felt just shifted and slid out of the way.

My fix? Paper hole punch. Like butter, right through them both.  


Next was the sewing the openings - the top and bottom edges. The instructions say to edge stitch everything, but honestly, it looked like crap. So instead, I fiddled around with my sewing machine until I found a basting stitch I liked. I also learned that the felt wouldn't work on the bottom - the feed teeth just rubbed the felt, not pushing it through. I'm too used to having lining side down, it weird-ed me out, but I had to flip it so the vinyl side was down. You can see the basting on the picture below. Looks mighty fine, much better than the edge stitch. 

Handy trick #I-Lost-Track: When hammering in snaps, do it on an old cutting board that you don't care about too much. That way, you don't also hammer dents into your kitchen table. 

BTW, Sorry, honey. 


And here it is: your first view of THE MOST AWESOME REMNANT EVER. It's a tan leather like vinyl with a gold splatter pattern. I love it! I found snaps with an antique brass finish, and I had some old golden yellow thread I could use for the stitching. Looks pretty sweet, huh?

First time I've ever attached snaps to anything. I think it went fairly well. They survived my tests, anyway. 


I did the same stitching along the belt piece, black thread on one side, gold on the other. This picture shows how the light can play with the gold splatter, and how nice the stitching looks. It gives it a decent edge - the edge stitch kept the ends too raw. The basting really erases all the tiny imperfections my cutting left behind. 


Then the trouble started. 

The stitching that worked so well, and looked so good, when used on 2 layers of fabric, couldn't handle 4. I did everything I could think of. I tried it with pinning stitches. I tried using paperclips to hold things together, tried having thick scraps behind to level out the foot, I did everything I could think of to avoid it, but there was none. 

I had to hand stitch.

The whole bloody thing. Well past sunset. 

But, once it was finally together, I did a test with the bottle. I think it looks pretty good, if I do say so myself. :) 


I decided to not sew in the stitches on the sides by the handle. It makes sense for tapered bottles, like your standard plastic variety, but it didn't make sense for my non tapered bottle.

Remember before when I expressed that I had an evil plan involving the strap? First off, if you have the fabric, don't bother following the instructions and cutting out 2 pieces just to sew them together later. No one wants a seam in their shoulder if they can avoid it - just makes extra work. Second, the holes for the strap to go through, though reinforced, are not super huge. Plus, there is a large area where the strap will be 4 fabric thick, where it gets sewn together. So why not only have it 3 fabric thick? I left extra on either side of just the vinyl - the amount the pattern says for the fold and the attachment. I lined where the felt ended up with the top of the bag, folded over, and stitched the heck out of it. Still a finished end, but not as thick, so it moves through the opening easier.


Here it is! the final, finished product! 


This below is with the flash, really shows off the shine of the gold. :)


There you go! What do you think? I have plenty of THE MOST AWESOME REMNANT EVER to make another project of similar size, or even a bit larger. Thoughts? Suggestions?

Saturday, October 14, 2017

Perspiration Pattern 1

I am so pleased that y'all found the last Not Really How To, if not helpful, at least interesting. 

My next project is one that I am having a lot more fun with. :) As many of you may know, I'm rarely without my reusable water bottle. It goes everywhere with me. Which means I leave it everywhere. Also, my favorite bottles aren't insulated, so on a warm day, with cold water, it sweats. A lot. Plus, carrying it can be quite hand numbing. So... I am making a water bottle carrier! Specifically, this one: <https://butterick.mccall.com/b5936>

Reading the instructions, and buying the supplies, I realized a few ways to make this easier, so I'm going to share them with y'all, because I'm nice like that. :)

So first I cut out the patterns from the super flimsy tissue paper, and ironed them, which didn't seem to make them any smoother, just more staticy. The pattern has a spot for expanding it, but doesn't explain how. So I guess I will. 

First, I measured my fave bottle. I want the cap to be just above the bag, so I've measured this at 8 1/4 inches.
I took this out of the fridge and quick shot the picture, and you can see the condensation already forming. It's only 60 in here today. This bottle sweats more than I do in the summer!

Next I measured the pattern, placing the 8 1/4 at the pattern neck, so I can clearly see that the extra I will need is 1 5/8 inches.


Time to get out the Paper Backed Fusible Webbing, and on the webbing side, I carefully laid out my pattern, laying them all face down. I fiddled around with placement for a bit, deciding how to lay it out. I next to never use the layout suggestions in the instructions - they waste so much fabric! A little pre-cutting Tetris can save a lot of usable stuff from ending up in the trash. Once I had it where I wanted it, I taped them down lightly with masking tape, being careful not to get tape on other patterns - the tissue will tear long before the tape will let go. I didn't tape down part 3 yet, though. Need to do something else first.


Now, flip everything over, and trace the entire pattern onto the paper backing, keeping all the special bits. This way, when I'm done, I will have new copies of the pattern, in a more durable material. :)


When I got to the "Adjust Here" line, I stopped tracing. I got out my measuring tape, measured the 1 5/8 inches, drew a dot, repeated on the other side, flipped the paper, and moved the pattern accordingly. This picture is taken from the webbing side, showing how easily you can see the pencil through the paper. 


Once pattern 4 was lengthened, I could position 3 to waste the least amount of webbing, and make sure I avoided the small tear. I didn't find any webbing at the store that didn't have any tears, so I needed to be sure I could maneuver around it. Hence, doing 3 after 4. Also, it didn't show before, but I have 2 copies of the belt 5, like the instructions say. However, I'm not following the instructions for the belt's construction.

Wish I could iron this flat like the pattern tissue, but... yeah. probably not a good idea.

Now I'm going to iron the webbing to the lining -some lovely black & white felt I got on sale. Not only is it made from 100% recycled plastic bottles, it is surprisingly absorbent for, well, plastic. I also find it appropriate/funny to make a reusable water bottle carrier out of other people's recycled one use water bottles. :)

This is the 2 belt pieces - it doesn't make any sense to me to cut 2 separate belt pieces and then sew them together. I have enough fabric, I'm just going to make it one solid piece. I ironed the one on the right down first. Once it was secure, I pulled up the paper just a tiny bit, to make sure there isn't any gap in webbing, and then ironed the second bit on. 


Now, the cutting! Using the webbing as an iron on pattern cuts out the entire step of having to trace anything onto the felt - just cut along the paper. Easy, and time saving.


The instructions say to not cut out the holes for the belt till WAY later, but I know cutting out something this small, once the 2 pieces are fused, is going to be a pain. Instead, I'm taking advantage of how the paper stabilizes the felt, got my trusty knife and cutting mat, and easily sliced the tabs out.


I compared the belt against myself, and it was just a tad to short. Perfect. Why perfect, you ask? Well, you'll have to wait and see. ;)

Finally, I'm arranging the felt on the back of THE MOST AWESOME REMNANT EVER. Seriously, this fabric is amazing. I find the most awesome stuff in Joann's remnant area. Oh? You want to see what it looks like? Well, you're just going to have to wait. 
BWAHAHAHAHAHAAA! 


Sorry, got a bit carried away there. 

Why are you going to have to wait? Good question. Well, apparently, felt is a really, really good insulator. I ironed these to the fabric backing for AN HOUR and they still didn't completely seal to the main fabric. The felt was hot to the touch, but the heat wasn't transferring well to the webbing. This is great news for my cold water in the future, but a serious headache now. 

This battle ended up taking the last of the daylight, as a hail storm decided to roll in, and I've learned from my eye strain - only sew during daylight hours. 

So the rest will have to wait till tomorrow. However, I can say that I hope you see how this will be the same as the paper - just cut the fabric, exactly like the paper on the felt.

Monday, October 9, 2017

Michief Managed!

So I awoke this morning, a calmer and more focused Jen. I was smarter than fiddly fabric, wasn't I? So I moved my hand sewing equipment to the kitchen table because it has great sunlight, and I know now that part of my issue last night was not being able to see the black thread against the 3 different kinds of black fabric... 

So here I am, prepared for a morning of hand sewing.  My first order of business is to attach the open  piece to where the pocket is sewn to the $DHT*&# lining panel and the hip side seam.

Now the side of the pocket next to the lining is done, I need to do the side that faces the pant, which is extra irritating because, not only do I have to twist everything to crazy just to access that spot, but because the pocket opening isn't a straight line, the outside appears shorter than the inside. Hence, the original offset edge.


Nothing wants to sit still where I tell it, and even using pins, the fabrics are slippery and slide all over the place. Once I've finally sewn the above piece, I double check to make sure I didn't sew the pocket shut anywhere. 
Not that I thought I had. I just know my luck and skill level, AKA not the best.

Here you can clearly see that the original pocket - I couldn't even get my hand in to the wrist. that seam? That's my thumb. Yup - can't even get the whole thumb in the dang things. Now you see why I am still willing to go through this?

Now I have attached the new pocket to the old pocket along all the seams I can - it is the point of no return. Time to cut open the old pocket. 
I know I have been whiny about how this project has made me feel, but at this point I do experience a shift. Yes, this has been obnoxious beyond understanding. However, it's because whomever made the original pocket, even though they made it WAY TOO SMALL, made them to LAST. These things are DURABLE. Not only do I have to seam rip a base seam, but the pocket has also been serged together. There was no way this pocket would accidentally come apart. It was a pain to get it apart on purpose.


Here I turn the pocket inside out, from the front, to make sure the opening is big enough and otherwise check and make sure I haven't completely destroyed one of my best pairs of work slacks.


Now that the original pocket is open, and the new pocket completely encases it, I need to stitch shut the last open seam - the space between where the pocket is attached to the exterior seam, and the new pocket bottom. I rolled it to try and give it some extra strength, and also to try and keep the fraying to a minimum. This silky stuff frays like crazy. 


Ok! Here is the finished addition (YEAH!!) The one edge I could sew on the machine is on the right, the one I had to finish by hand is on the left. all the other work of attaching it is hidden under the panel, but you can still see some of the design through the mesh, so you can see the pocket goes all the way up to the waistband. This had added a LOT of length - remember, the original pocket didn't even go past the panel.


Moment of truth!! This new pocket is HUGE. I can get my arm in past the WRIST. Here it is, in all it's comfortable, unbunchy glory, sporting my phone with room to spare.
Yes, this was a time consuming nightmare. Yes, you can see a bit of my hand stitching past the pocket. But I really don't care - can't see it if I'm not standing in sunlight, and who looks that closely at my pockets anyway? 
Final thoughts: Was the project worth it? Yes. Mostly. Kinda.  I did one pocket, the one I usually put my phone in. I'm not willing to go through this headache to adjust the other pocket on these pants. Worth it for the phone? Yes. Just for symmetry? Nope. I never really put anything in my right pocket anyway. If it becomes a nuisance later, I guess I can adjust the other pocket later. But certainly not today. I still have to see how the new pocket holds up to daily wear and the washing machine.

Frustration, thy name is Women's Pockets

This has been driving me nuts. It took me a long time to even FIND work pants with pockets, as I need pockets for my job - required to have my phone on me at all time. However, even with pockets, If I sit down, it falls out. 
So this is not really a How to, more of a How I really ticked myself off tonight.

These are a pair of shorts I had purchased in the men's department this summer, because I was unable to find shorts that were work appropriate in the women's department, in three different stores. These are the pockets I want to emulate, because I love these shorts. Nothing ever fell out of them, and the pocket tapers with the angle of your arm, and is about 11 inches deep. 

This is the pair of women's dress slacks that I am attempting to fix first. I was hoping to be able to take a picture of the pocket, but even with the pants inside out, the pocket is hidden by this mesh flap. I'm assuming it is some type of stabilizing panel. However, you can still see that the pocket is less than 6 inches deep.


Here ya go! under the mesh, we can see that not only is the pocket 5 inches deep, but it tapers THE WRONG WAY. The deepest part is by the outside seam, not the side by the fly. Grrr.

So, here is what I want to do. I don't want to do the easy option, just cutting the pocket open and sewing in fabric, because that would leave a noticeable bump seam from the outside. I was originally going to use a flannel, but I want to reduce as much bulk as possible, so it wasn't as noticeable.  I finally went with this satiny remnant.

I measured out a length so that I could make about a 10 inch pocket. I made it so that the fold would be the bottom of the pocket. One side is longer than the other, the shorter side will be for the front. Sewing it right sides together, because I want the shiny sides being the ones the inside of the pocket.


Flipped around, we have 2 finished sides, and 2 open sides. 


Unfortunately, as is obvious from the above picture, it needed some ironing. I hate ironing. I stitched a quick line down the seam to make sure it stayed flat, & the extra support.


So here is what I'm trying to do. I'm trying to attach the new pocket as close to original seams as possible, to eliminate bunching or bulges. However the stupid panel mesh is very much in the way. I have pinned it back as best I can, but it is sewed in to the fly and the exterior hip seam, so there is no working around it. Tucked the sewn edge tight against the loose edge of the pocket. 


I pinned the longer edge as tight up against the waistband as I could. This last picture is the moment I realized that there was no way I could do any of this with the sewing machine - It was shortly after this that I realized I was not going to be able to finish this tonight. Dang fabric would NOT STAY PUT.  


Trying to figure this all out - how to even get to the other side of the pocket, how to sew up the last raw edge... my brain is all mushy. 
I need a shower. Will tackle this more with the sunlight.

Thursday, October 5, 2017

Renew

Well, it has been years since I used this, but someone reminded me that I can more easily share my creative endeavors with a blog, & I remembered - "Oh yeah, I have one of those."
<Blows dust off>
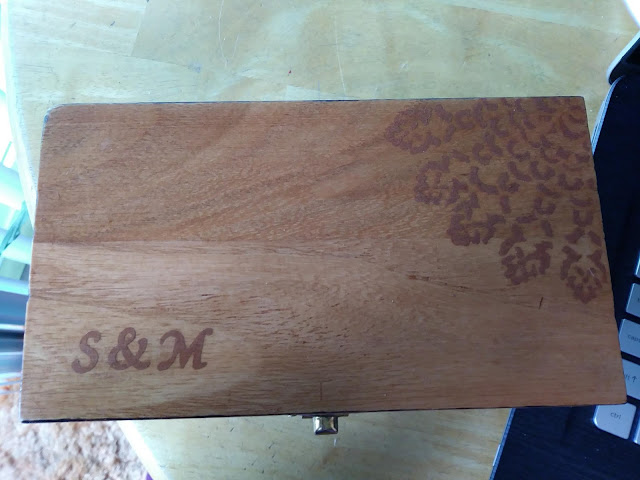
So I am today sharing my newest creation. I have made jewelry in the past, & got a wild hair to make a box to put it in. 🙂 Please let me know if you found this interesting or useful. If you have any crafty questions, please don't hesitate to ask. I plan on posting my different crafty bits up here frequently, as I find sharing my endeavors helps keep me more accountable. 
This particular box is actually a wedding gift for my dear friends Sarah & Michelle. May you both live long and prosper. 😙
This is how the box originally appeared. Simple, slightly rough wood, shiny brass fixings. I do not yet have the tools to make a box myself... that's going to have to wait till I have a garage.
This is the back after completion. I aged the brass fixtures with a mixture of vinegar and salt. The filigree design is from a stencil, with red & gold acrylic paint (the shimmer of the gold would not come through on the pictures)
The wedding date is burned into the lid interior. The interior of the box is stained with a teal wood dye, so the grain is still visible, and the bottom is lined with patterned felt. 
This is the lid. The design in the corner wraps around to the back, as seen in the above picture. After the paint was applied, I used a light pecan stain, and two layers of polyurethane. I was worried that the stain & sealant would completely cover the design, but it actually seems to have brought it out into a higher relief.
I lightly burned all the exterior edges of the box - I feel this gives it an older feel. The final touch was adding the metal feet, which are beautiful, but the most annoying part of the whole project. :) They didn't come with attaching brads, so I used ones from the hardware store, which I feel were too long. The bottom of the box is also covered in the same patterned felt, which also goes over where the feet were nailed into the box, covering the fact that the brads don't match the feet. :)

Saturday, July 13, 2013

Dinner with the family

So, how would having dinner be different, if your sister could see the future?
~~~
He nodded in understanding. “Back to the thing that has me the most concerned. Your Majesty, I’m not sure what to say. How do I honor the fallen, without spreading unnecessary fear? How much information is too much? Do we downplay the tech, or try to warn the people about the potential threat? Do you have any advice?”
The King smiled. “I’m not sure if I am the right person to ask. Scions and the Sisterhood have known about it for ages, but it has not, to my knowledge, been a threat till now. Is it a future threat?”
Ivy sighed. “I honestly do not know. I have never heard of tech turning on, let alone causing this much damage. The Sisters I saw at the festival didn’t even mention the tech, just that they were concerned about my injuries.”
Rose cut in. “That is because they are convinced they have a handle on it, just like they’re convinced that they are the only ones who can handle a Far Seer when they go too far.” Her blue eyes became cold and distant. “They think they know what is best for everyone else.” Her eyes widened, unfocused. “They think victory is secure in their numbers, in their toys, but it’s so high up, and they’re so far down, and the fire flies so quickly. They don’t even understand the shear number of tech that they are up against, let alone how to stop it. It is sad what horrors people will let come to be in the name of peace.”
Ivy leaned across the table, placing both hands upon her sister’s squeezing tightly. “Rose, what do you see?”
“Flying low, Targets acquired No targets! Those are just people trying to defend themselves! War party recognized!” Tears fell from Rose’s unblinking eyes.
Willow, obviously scared, grabbed a hold of Rose’s arm. The King put a hand on his daughter’s back, rubbing it gently. Ivy shook her sister as much as she could, from her awkward angle across the table. “Rose! That was me, Rose, that’s in the past. You’re in the past, honey. Try to focus. Focus on our touch, on my voice.”
“It sucks the very life out of you, if you don’t know what you are doing you will become a husk.”
“Rose, honey, we know. I saw. Elliot and I, we both saw.” Ivy sighed, making a decision. “Rose, find now. Can you follow my voice, find now?” Her head nodded, barely perceptibly. “How does Elliot address tech tomorrow? Can you see tomorrow? What should we do?”
Her sister’s pale eyes, fading into white, looked around the room, through them. “Teagan will volunteer, but don’t let him. He has Scion blood, many times removed, but enough. Ben is a better choice. He will collect the tech in his warehouse, to melt it down, but he will not get the chance.”
“Rose. Pull back, honey. Be here, be now, be still.”
Elliot watched as Rose’s eyes returned to their prior blue, and finally slid to focusing. She began to shake, as though shivering, and King Alexander wrapped her tightly in his arms. She shook, and cried silently, clinging to her father. He held her till she calmed down, then asked, quietly, for Willow to take Rose to her room. The young girl’s eyes were wide, concerned and scared, but she agreed. She wrapped her arm around her sister’s waist, taking on most of Rose’s weight, and walked silently out of the room.
As soon as they were gone, King Alexander sighed. “All considered, this was still a good day for her.”
Ivy turned her full focus on her father. “What was with the shaking? I’ve never seen a Seer do that before.”
He shook his head. “She has symptoms different than your mother. There are times when she seems to cut off, to leave her body. She becomes a statue, sometimes even stops breathing, but usually only for a moment. A few weeks before the festival she started shaking when she lost control, a tremor in her hand, a spasm in her leg. Then, when we were having an audience with Duke Shahar… she was barely with us the entire meeting. At the end, she started to shake all over, like she had been swimming in January. She fell out of her chair. Myself, the Duke, and a servant helped to hold her still, until it stopped. After seeing that, the Duke went straight to the council, telling them what he saw. They insisted we hold a meeting, they even interviewed the servant. The council advised me to officially name another heir. That was two days before I left for the Festival.” He ran his hands through his hair, sighing. “The last coherent thing she said, before falling out of her chair, was ‘he can’t set the bones. it hurts so much. It is healing itself oh Goddess it’s firing again.” He sighed, resting his elbows on the table. “I didn't have any idea at all what she was talking about, no one did, not even your Mother would comment on it, but that night, when I heard the explosions, the screaming, I was terrified. And then, when I heard about your injuries…” He shook his head. “Let me guess, Elliot. You don’t know how to set bones?”

Elliot shook his head slowly, partially in shock. “No, sir, but that is a skill I intend to pick up very soon.”

Tuesday, July 9, 2013

camp Nanowrimo

As I had promised, here is a portion of my writing for NaNo this month. I am not anywhere close to par, so I fear I will not hit 50k words by the end of July, but I have hopes that I will get a lot done this week. Wish me well!
~~~~~
Samuel maneuvered his horse out of the caravan at the road marker showing the boarder of Cynwrig. The winding foothills at the south of the main road were easy riding on his horse. The miles easily disappeared beneath the horse’s stride. The foothills shifted into baby mountains, and the trees changed, from towering conifers to squat fruit trees, all planted in neat rows. Each tree was just above Samuel’s head height, while seated on his mare. The spaces between the trees were recently trampled, the fruit harvest finally complete, making travel easy. Though his friend had only lived here a few years, Samuel didn’t need to direct his steed. She already knew the way to cut across rows till they came upon the main path, two well worn wagon tracks cutting a thick swatch through the trees. A quick turn and a kick at the mare’s flanks, and Samuel headed up the path to center of the orchard.
Two barns flanked a log cabin with a full wrap around porch. The posts supporting the porch roof a lighter tan than the rest of the building, obvious in their newness. The sun reflected off of the windows, turning them into mirrors reflecting the orchard back at him. Samuel dismounted and wrapped the rein loosely around the railing, skipping the first stair and the third to the porch. He stopped at the support post, running a hand across the rough spots on the wood. This had been the first one he and Devon had stripped of bark, they hadn't been sure of what they were doing, and their novice showed in the rough splinters. He would need to sand it soon. He turned to knock, but before he could reach the door, it opened to reveal an older woman.
Her blond curls were striped in a gray several shades lighter than her eyes. Her dress was worn, practical, with a half apron tied at her waist, stained in bright red cherry juice. The creases in the corners of her eyes deepened as she saw Samuel. “Samuel my boy, you’re a day late! You have too much fun in that midway? Perhaps spend too much fun time with that lady friend?” Her eyes tightened, shifting, searching the tree line. “Where is Devon?”
Samuel pulled a mug from his belt, and a green ribbon. He fiddled with both for a moment before handing them both to the woman. She took them in both her hands, eyes not leaving the mug. “Miss Gethin? Ma? May I come in?”

Devon’s mother nodded, shifting back, allowing Samuel to come inside.